Simphony API
Purpose:
This training guide is designed for POS and Support teams. It explains how Simphony APIs work, what must be configured, and how to troubleshoot and resolve common API issues. The guide is written in a simple, step-by-step, practical format to support faster resolution and better first-call fixes (FCR).
1. What the Simphony API Does
Simphony APIs allow external systems (such as delivery partners, mobile apps, kiosks, and websites) to interact with Simphony as if they were a physical POS workstation.
- Read
menus, prices, and tenders
- Create
checks (orders)
- Send
payments
- Automatically
fire orders to the kitchen (KDS / Printers)
Important:
APIs do not bypass Simphony rules. They behave like a virtual workstation and employee. If a configuration would fail on a physical POS, it will also fail via the API.
2. Mandatory Simphony Components (Pre-Checks)
Before troubleshooting errors, confirm ALL the following exist:
- API
Workstation
- Service
Host linked to the API Workstation
- Transaction
Services Gen1 and Gen2 enabled
- API
Employee (system user)
- Correct
Revenue Center setup (Autofire)
- Default
Tenders for online payments
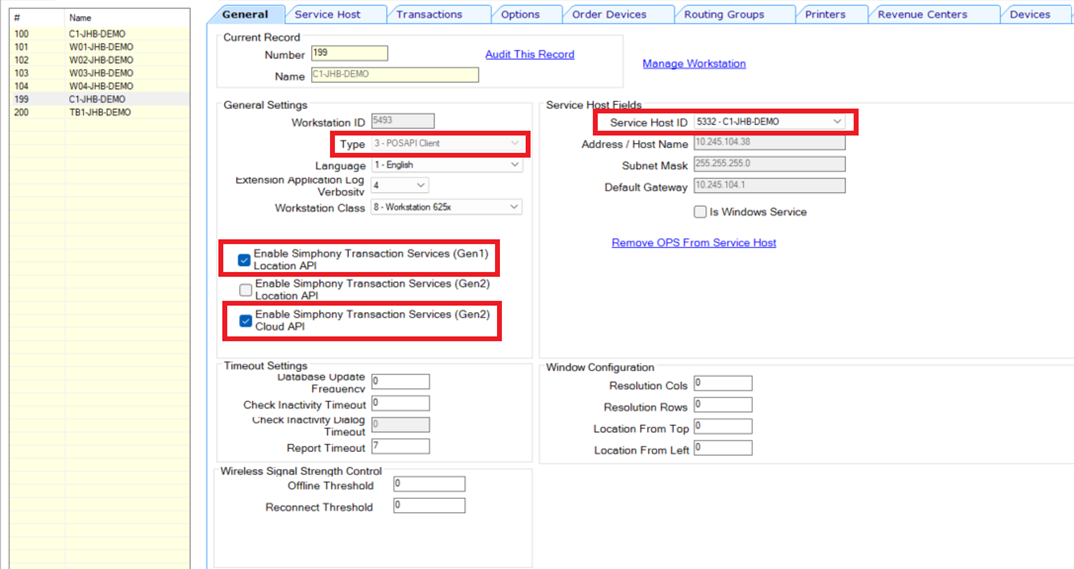
3. API Workstation Setup (Most Common Root Cause)
The API Workstation is one of the most common causes of API issues.
What to Verify
- An
API Workstation exists in EMC
- It
is linked to a valid Service Host (in most cases: CAPS)
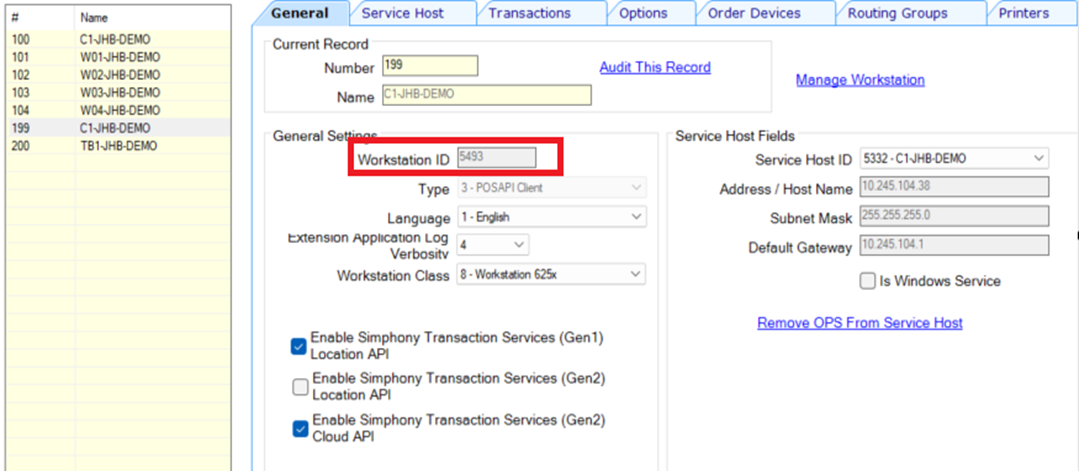
- POSAPI
Workstation ID is selected
- Other
fields are greyed out (this is expected behavior)
- Transaction
Services options are enabled
Why This Matters
The API Workstation behaves exactly like a physical POS terminal. If it is misconfigured:
- Orders
will not inject
- Menu
or pricing retrieval may fail
- STS
errors (400 / 500) may occur
4. Service Host Validation
The Service Host connects the API Workstation to Simphony
services.
Service Host Must:
- Be
active
- Match
the API Workstation number
How to Verify
- Compare the following:
- API
Workstation number in EMC
Workstation ID in the Service Host web.config file:C:\Micros\Simphony\WebServer\wwwroot\EGateway\web.config.txt

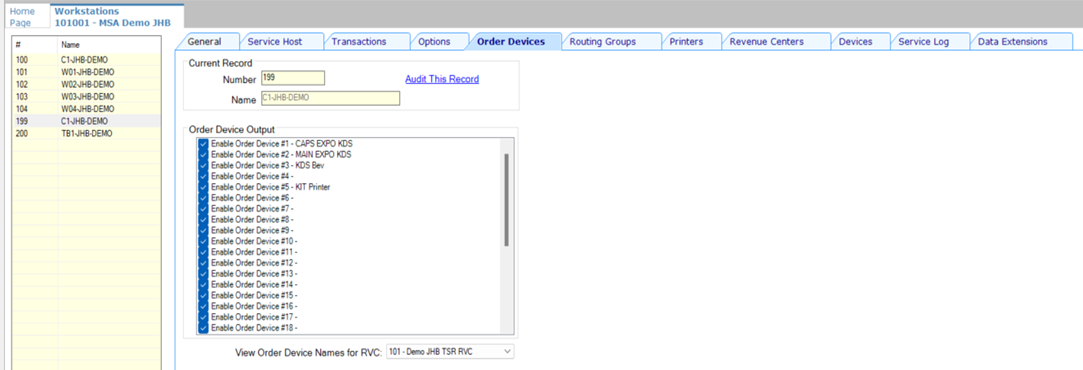
5. API Workstation not sending orders to KDS / Order Printer
If API orders are successfully created but do not appear on
KDS or printers, check the following:
Required Check
- Ensure
All Order Device Outputs are enabled on the API WorkstationPath: EMC → Property → Setup → Workstations → Select API Workstation → Order
Devices
6. Revenue Center (RVC) – Autofire Configuration
For all Revenue Centers used for online ordering (e.g. Uber
Eats, Mr D, Yumbi, etc.), Autofire must be correctly configured.
Required Autofire Settings
- Autofire
Employee assigned
- Autofire
Workstation assigned
- Default
Autofire Tender assigned
Required Autofire Flags
Ensure the following options are enabled:
- Enable
Autofire in this Revenue Center (Option 3)
- Print
Guest Check at Time of Autofire (Option 2 – optional, based on store
requirements)
- Configuration Path: EMC → Property → Revenue Centers → RVC Parameters → Autofire
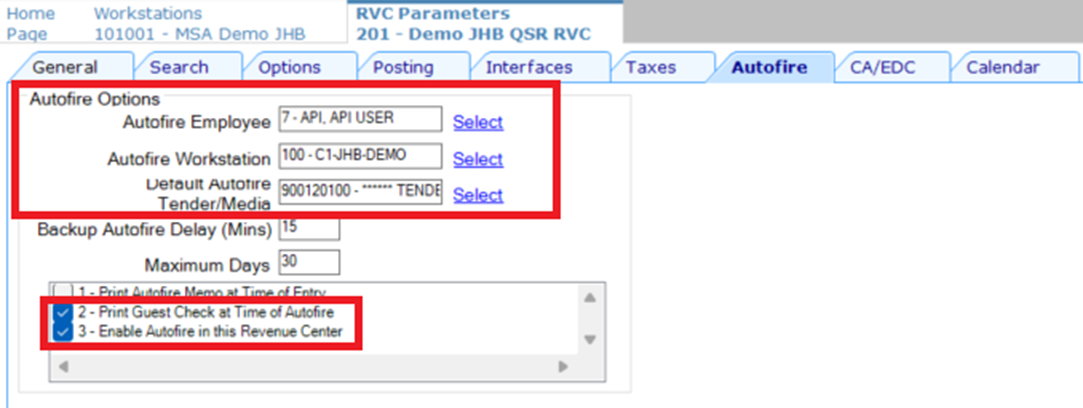
If these values are missing or misconfigured, online orders will not fire correctly.
Why This Step Is Critical
- API
orders must autofire
- There
is no cashier to manually process the order
- If
Autofire is not configured, online orders will not complete correctly.
- This
check ensures the environment is fully ready for online order injection
across all channels.
7. To ensure API errors are clearly logged:
- Enable
Log File Archiving and Log Verbosity (As per the Log File Archiving document)
8. Recommended Troubleshooting Order
When an API issue is reported, troubleshoot in this order:
- Confirm
API Workstation setup
- Validate
Service Host configuration
- Check
Transaction Services (Gen1 & Gen2)
- Verify
RVC Autofire setup
- Confirm
Order Device outputs
- Review
API logs
This sequence resolves most API issues without escalation.
9. Simphony Gen2 Transaction API Report (R&A)
This must always be the first step in API troubleshooting.
Navigation Path: Sign in to R&A → Administrator → System → API Activity
→ Simphony Gen2 Transaction API
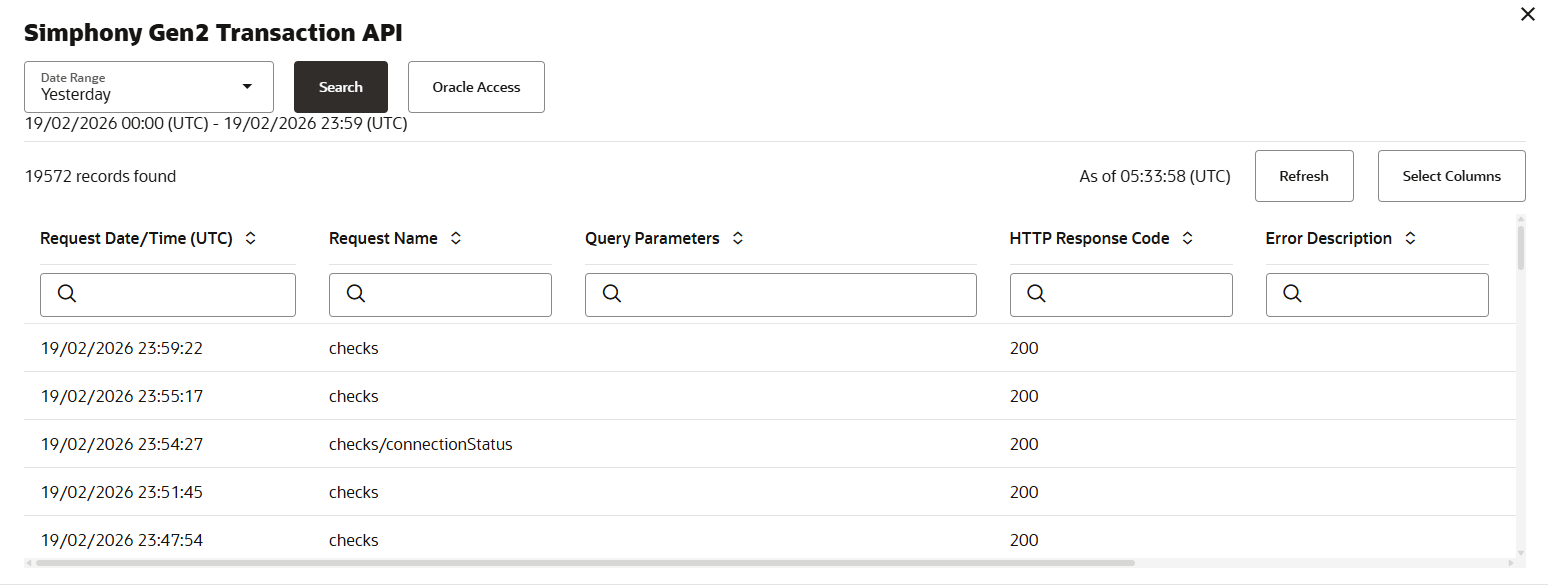
Why This Step Is Critical
The Simphony Gen2 Transaction API Report provides visibility
into all API traffic between external systems and Simphony.
This report confirms whether:
- The
third-party system is sending requests
- Simphony
is receiving the requests
- The
system is responding successfully or failing
- An
HTTP response code is being returned
- An
error description has been generated
Before checking configurations, workstations, services, or
Autofire, you must first confirm whether traffic is reaching Simphony.
Skipping this step can result in troubleshooting the wrong
area.
What to Check in the Report
- Select
the correct Date Range (ensure UTC time is considered).
- Filter
by Request Name (e.g., checks, checks/connection Status).
- Review
the HTTP Response Code column.
- Review
the Error Description column.
Check
for:
- Repeated
failures
- Time
gaps in activity
- Patterns
matching the reported incident time
For detailed meaning of HTTP response codes (200 / 400 / 500, etc.), refer to: Step 10 – API Gen2 Status Codes/Errors
Why This Must Always Be First
This report immediately determines whether the issue is:
- External
(third-party / network related)
- Configuration
related
- Transaction
Services related
- Revenue
Center / Autofire related
It narrows the troubleshooting path before deeper technical checks are performed and prevents unnecessary escalation.
10. API Gen2 Status Codes/Errors:
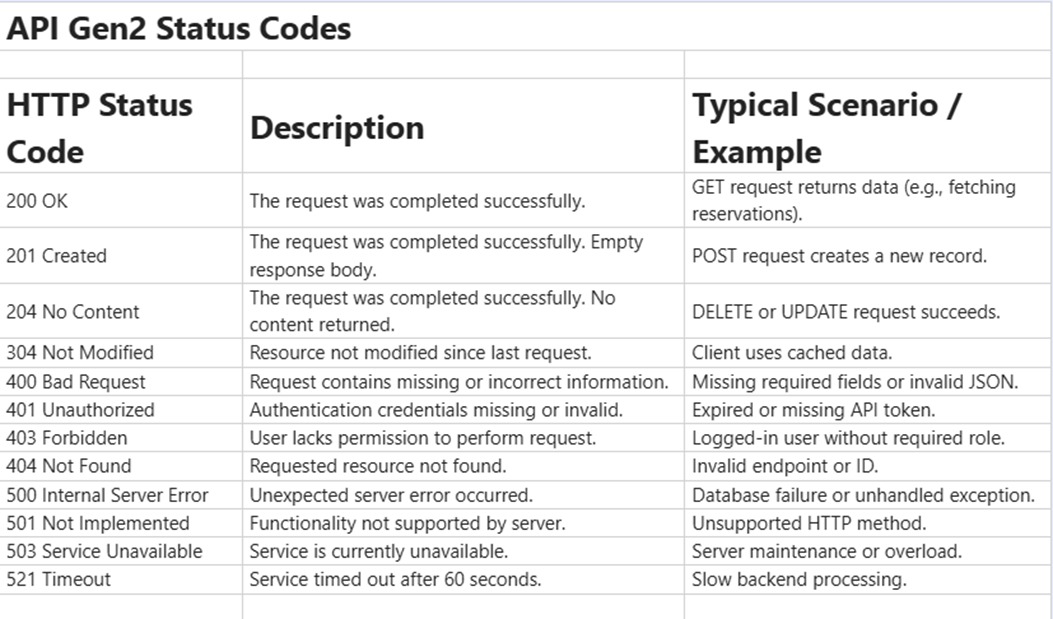
This lesson is not ready to be taken.