How To Manage the OXI
1. Introduction
An
OXI is a program used to link Opera to another system which, is not fully
integrated, in order to transfer Availability, Blocks, Reservations, Rates and Profiles
The OXI “translates” the information from the one system into a “language” that Opera can understand.
Once installed the OXI needs to be monitored in order to ensure that messages are correctly transferred between systems and if necessary, the configuration updated.
Daily Maintenance Tasks
· Ensure that the OXI Service is running
· Ensure that all the processors are running
· Ensure that no messages have failed in the upload / download from the 3rd party
· Ensure that the OXI Purge is running
· Ensure that the Business Event Processor is running
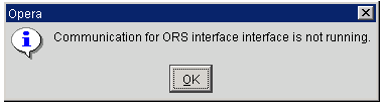
2. OXI Interface Service
The OXI Interface Service for ORS facilitates the transfer of messages to and from PMS.
This service should always be started and in a running status. If this service is not running, the following message will appear in Opera:
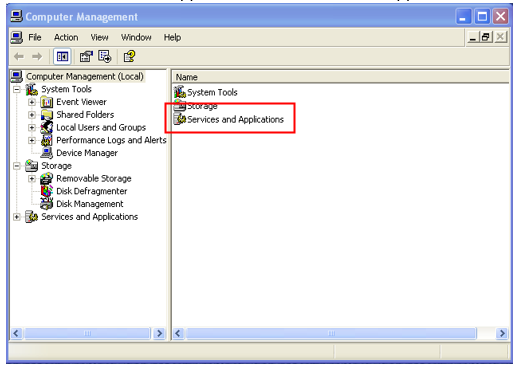
Steps to monitor the OXI Interface Service:
- Go to the Desktop on the PC hosting the OXI Service
- Right click on the icon for "My Computer"
- Select "Manage"
- The below screen will appear - select 'Services and Applications'
- Select Services
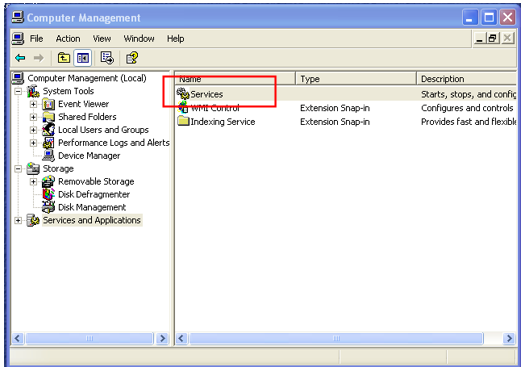
- The following screen will appear.
- Select the 'Standard" tab at the bottom of the window
- Move down on the list of services until you find the 'Opera Interface for ORS' service

- The status for this service must be started – check this in the “Status” column
- Should this service not be started, right click on the service and select 'Start'
- Once this service is started you can close this window.
3. OXI Processors
Three OXI Processors exist in the OXI:
- Download Processor – receives messages from OCIS
- Lookup Processor – handles the profile lookup functionality
- Upload Processor – sends messages to OCIS
These processors always need to be in a running status in order to ensure the transfer of data between OCIS and PMS.
Should any
of these processors stop, one or more of the below errors will appear in Opera.

Steps to monitor the OXI Processors:
- Log into OXI
- Select the relevant OXI
- Select Interface Status
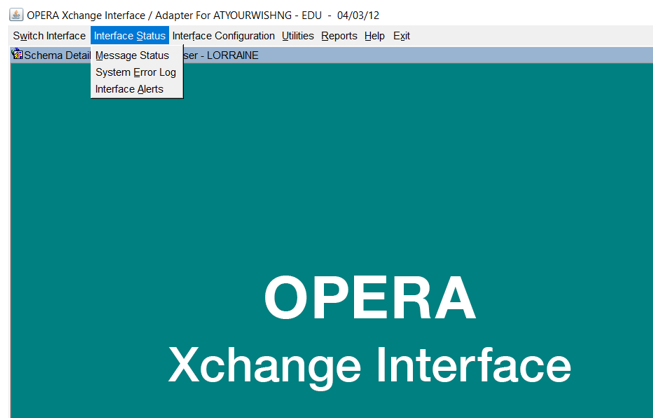
- Select Stop / Start Processors
- The following screen will appear detailing the status of the specific processor:
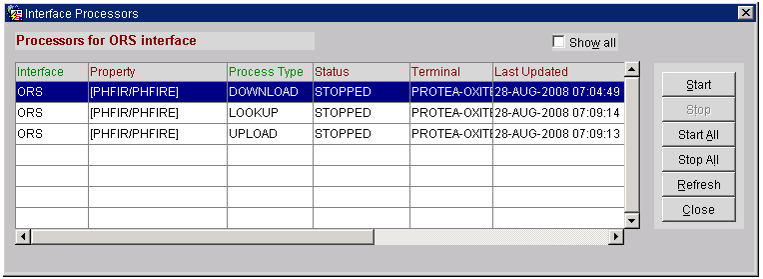
- Select the Start All button
- A message will appear that states the number of processors initiated to start

- The status of the processors will now change from Stopped > Waiting > Running
- Select the refresh button
- Once all the processors are running the below screen will appear:
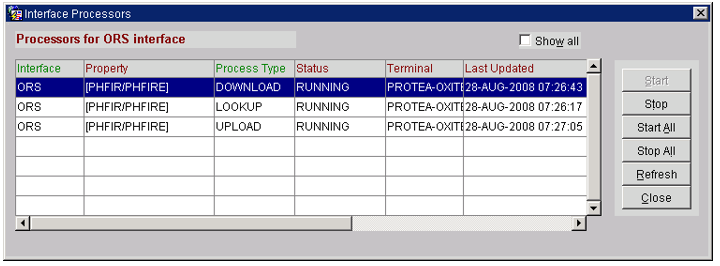
- You can now log out of OXI and resume work in PMS as normal. Should the above messages appear at any time, please follow the procedure and start the processor/s.
- Should any of the processors remain in a Waiting status – please contact Micros Support for assistance.
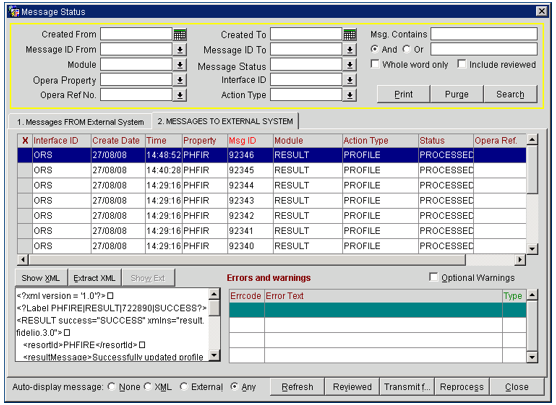
4. Message Status
a. Messages from External System
To access
the Message Status Screen, select Interface Status > Message Status. The
following screen will appear:
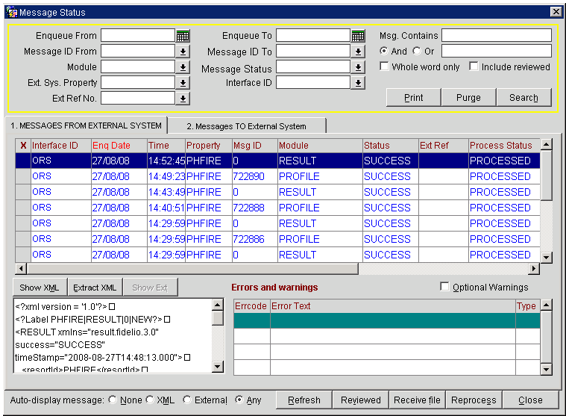
The
upper part of the Messages Status screen contains a search section
framed in yellow. Here you can filter out specific messages you would like to
see on the status screen.
Explanation of Search Filter fields
Enqueue from Start
date for transmitted messages
Enqueue to End date for transmitted messages
Msg Contains Search for contents inside a message
Message ID from Starting message ID for this display filter
Message ID Ending message ID for this display filter
Module Module of the message i.e. Profile or Result
Message Status Status such as FAILED, SUCCESS, WARNING
Ext System Property The property ID provided by the external system
Interface ID Interface ID for the filter – ORS
Ext Ref No External system confirmation numbers
Explanation of Search Filter keys
Print
Works with a minimum of one sort filter to allow you to print a report of all Errors & Warnings for the interface. This report can even be narrowed down further by using the sort fields Module and Enqueue From/To.
Search
Start the search after you have selected the filters for the message display
Purge
This is the manual purge option for OXI status table entries. The purge is based on the filter criteria selected. This option can be used if an immediate clean up of the files in
the status table is desired.
Note – If the purge is used without any filter, all messages will be removed from the message status tables. A warning message will appear with the default set to NO.
The middle part of the MESSAGES FROM EXTERNAL SYSTEM screen is the real message status screen and shows the process status of transmitted messages. The Search Filter can be set to help find certain messages in this status screen.
Explanation of fields in the Message Status Screen
X Select one or multiple records for reprocessing at the same time
Interface ID The interface ID this message was created for – ORS
Enq Date Date when the message was received by the OXI
Enq Time Time when the message was received by the OXI
Property External system property ID this message was sent from.
Msg ID Unique ID in sequential order that the external system gives to each message when sending it to OXI.
Module Data module of incoming message, either Result or Profile
Status Shows the status of the message transmission
Process Shows the status of the message processing
The lower part of the Message Status screen is split into a Show XML/Show Ext for the messages and a part for Errors and Warnings.
The Show XML/Show Ext allows viewing of the original external
system format and the XML message format.
The Errors and Warnings part shows details of all errors
and warnings that have occurred during message transmission.
Explanation of fields in the Error and Warnings
Optional Warnings
This box can be flagged if you wish to see warnings of type ‘T’ (tentative) that have occurred during message transmission. These warnings normally indicate that conversion could not be applied or that a default has been used. These warnings are not critical and can therefore be suppressed by blanking out this flag. It is however recommended to clean up conversions and default problems in OXI to achieve absolute data accuracy.
Errcode
Error code in case the selected message has returned a warning or an error
Explanation of keys on the bottom of the screen
REVIEWED
Mark a message as reviewed after you have verified an error or warning. Click on REVIEWED button and the record will be marked as reviewed and disappear from the screen with the next refresh. In order to include reviewed records into the screen output, make sure that Include reviewed search option is checked.
REFRESH
Refresh the display of the message status screen. When loading the status screen, the message display is automatically refreshed. Once the screen is loaded, you will use this button to refresh the display if some time has passed since the last refresh. New messages will only be displayed after the use of the refresh button. It can also be used to remove any search criteria you have formerly set on the message status screen.
REPROCESS
Reprocess a specific message. This is useful in case the original transmission was unsuccessful. You can correct the error, e.g. by adding the necessary code to the conversion table, and reprocess the same message again from this screen. If the download problem cannot be solved through user correction at this stage, the message needs to be corrected in the external system and has to be sent again.
b. Messages to External System
This section of OXI needs to be monitored in order to ensure that all messages are successfully sent to OCIS. Should any messages have failed, you will be required to establish the cause of failure and resend the failed messages to OCIS.
To access the Message Status Screen, select Interface Status > Message Status. The following screen will appear. Select the second tab to access the Messages to External System Screen.
Some of the fields on this tab are identical to ones on the Messages from External System Screen, therefore only specific fields will be discussed below.
The upper part of the MESSAGES TO EXTERNAL SYSTEM screen contains a search section framed in yellow. Here you can filter out specific messages you would like to see on the status screen.
Explanation of Search Filter fields
Created from Start creation date for transmitted messages
Created to End creation date for transmitted messages
Opera Property The Opera property ID
Action Type Action that triggered the upload message
Message
Status Codes
The message status will indicate whether this message has
successfully been inserted in OCIS / PMS.
It is very important to ensure that failed messages are fixed as failure to do so will lead to the discrepancy in data between OCIS and PMS.
Messages Statuses:
SUCCESS - shown in case of a successfully processed message
FAILED - shown in case the message was rejected by OXI / OXIHUB. Possible reasons for failure have been provided.
WARNING - shown in case the message has produced mandatory warnings.
Error / Warning Types
Type of error or warning for selected message. This will display from Highest to Lowest severity on the screen.
· Type E indicates the Highest Error Level. This error type will be highlighted in RED text.
· Type O indicates an Oracle Error. This error type will be highlighted in RED text
· Type W indicates a Low Level Warning. This error type will be highlighted in BLUE text.
· Type T indicates an Optional Warning. This error type will be highlighted in BLACK text
· Type R indicates a Result Optional Warning. This error type will be highlighted in BLACK text.
What do the Warning Types mean?
1. Type T (optional) - just an information type of message usually carrying additional information for missing conversion, or the reason for applied defaults. An optional warning is not fatal and the message is still being processed. Action required based on these warnings would be a check and correction on conversion codes, defaults, and parameters.
2. Type R (result) – this is the response from an external system for a message sent by OXI. Results indicate whether the other system has received the message properly or if any problems have occurred. Action required is based on the result.
3. Type W (warning) - necessary alert to notify that some information requires attention. This mandatory warning is applied when OXI had to change vital information in order to process the message successfully. The warning could be about missing conversion codes, false defaults, or omissions of certain data elements. Action required is a correction in the OXI configuration.
4. Type E (error) and O (oracle) – these errors are fatal and OXI fails the message if these occur. Oracle or system errors apply for severe problems, such as missing parts in the XML message received, database access, or communication problems. Errors and Oracle errors require immediate attention as the rejected message may lead to inventory imbalances between the two systems.
5. OXI Purge Utility
The OXI Purge Utility ensures that messages are permanently purged from the queue tables in order to ensure optimum database performance. All messages older than three days will be deleted from the queues.
The status of this utility should always be running and should be checked on a daily basis.
To access
the OXI Purge Utility, log into OXI, select Utilities > Purge Data.
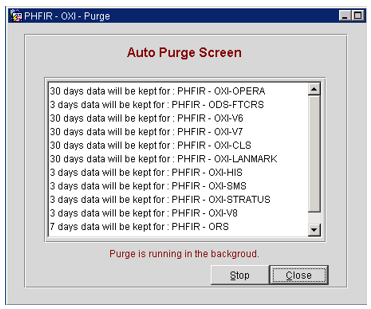
Should
this utility not be running, select the start button.
6. OXI System Error Log
This screen is used to view the system error log for OXI. The purpose is to display any internal system activity and errors or warnings that are not displayed on the Message Status screen. It also contains entries for every start and stop of the interface processors.
To access this screen, select Interface Status>System Error Log.
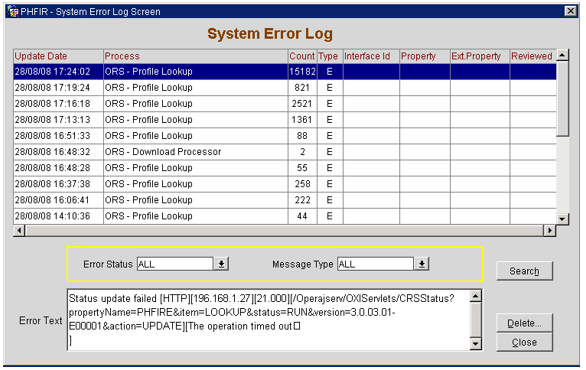
Explanation of fields
Update Date
Date and Time stamp for errors, warnings, and information logged with the newest action at the top of the screen. Older messages will be moved down as new messages are created.
Process
Indicates what processor the action came from
Count
The count specifies how many times a processor was started or stopped. It will also count how many messages were dequeued/sent to the external system or messages enqueued/received from external system.
Type
The type of error will be listed as ‘E’ for Error, ‘W’ for mandatory warning, and ‘T’ for optional warning.
Interface ID
The interface name will be logged if the download processor is stopped.
Property
The Opera property name is identified when the external system sends messages to Opera or errors occur during message transfer.
Ext Property
The name of the external system property is identified when messages are sent to Opera
Reviewed
Once you have reviewed messages in the system error log you can check off the messages by clicking in the Reviewed column. Reviewed messages can be saved for later additional review, or can be deleted. They move to the end of the list after being checked.
Error Status
Defaults to ALL and can also be changed to look at only REVIEWED or NON-REVIEWED
Message Type
Defaults to ALL and can also be changed to look at only ERRORS, WARNINGS, INFORMATION, or ERRORS AND WARNINGS together.
Error Text
Description of the exact log entry, error, or warning. A list of current error texts is included in a table has been provided.
7. Business Event Processor
The Opera Business Events Processor screen allows you to view, start, and stop business event processor.
Select this processor through Utilities>Processors>Business Event Processor.
This is used to collect information from Opera into a queue from which then can be gathered by an external system, such as OCIS.
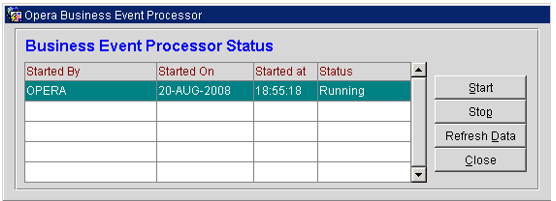
The Business Event Processor screen displays the following
information. Columns are populated once the Start button has been
selected and the processor status is Running.
Display Grid
Started By Displays the schema for which the business event processor is started.
Started On Displays the date when the business event process was started.
Started At Displays the time the business event process was started.
Status Displays the status of the business event process.
Buttons
Start Start the Business Event Processor.
Stop Stop the Business Event Processor.
Refresh Data Refresh the data on the Business Event Processor screen.
Close Close the Business Event Processor Status window.